I've been amazed at the response to my Sailor Moon look. Thank you all so much! Many of you had questions about how I did it and asked for a tutorial. I didn't think there would be much interest in this, so I didn't take any pictures of the process. But I can describe what I did, and I hope that's enough for you guys! The next time I do a cosplay, I will document the process to share more details.
But thank you again. I love that you all enjoyed it so much!
The Occasion
I've always loved Sailor Moon. She is like a bimbo who is also a warrior. All of them are bimbos, with Sailor Moon being the queen bimbo! Sailor Moon is also very special to my SheDaddy. A few weeks before her birthday, SheDaddy threw this look out to me as a challenge. I know she thought it would take months for me to do it. So why not surprise her with it for her birthday party? It is a hard look to do in such a short time, so I knew she would not be expecting it. And truthfully, I was not 100% satisfied with the result --- but when are we ever 100% satisfied with our looks? But when her birthday came, the happy look on her face when she saw her Sailor Moon wifey was all I needed to make me glad I took the chance!
The Wig
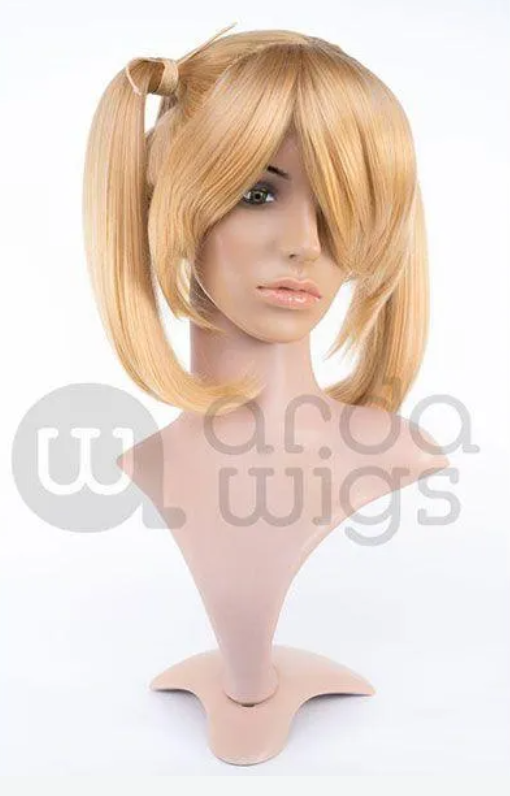 Obviously, the most striking part of Sailor Moon's look is her signature
wig. It's always good to stand on other people's shoulders, and I discovered that many cosplayers had done their own Sailor Moon recreations and shared their experiences. I didn't follow any single tutorial but instead used their experiences to build the best solution for myself. For the wig base, I used Arda's Chibi in light blonde (their color CL-060).
Obviously, the most striking part of Sailor Moon's look is her signature
wig. It's always good to stand on other people's shoulders, and I discovered that many cosplayers had done their own Sailor Moon recreations and shared their experiences. I didn't follow any single tutorial but instead used their experiences to build the best solution for myself. For the wig base, I used Arda's Chibi in light blonde (their color CL-060).
 I've written about Arda before - I love their wigs, and
they are incredibly supportive of cosplayers. Turning to Arda was a no-brainer.
I've written about Arda before - I love their wigs, and
they are incredibly supportive of cosplayers. Turning to Arda was a no-brainer.
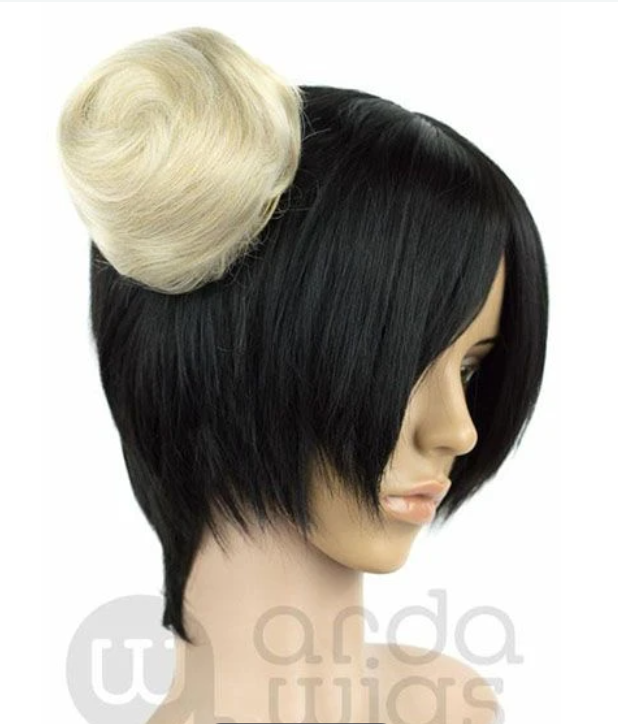
 I also bought two of their Hairbun CLASSICs, and two of their Long Clip CLASSICs in precisely the same color as the wig. Cosplaying can get expensive, and the wig cost was the most significant expense for this look, about 120 USD. You can reduce this expense, but the wig will probably not look good. I'll give some options at the end. I bought two of the Long Clip CLASSICs but only used one. So if you follow these instructions, you can save 22 USD over my expense by purchasing only one.
The ponytails of the Chibi wig are wrapped with some elastic close to the wig. So the first thing I did was cut the ponytails off just above the elastic, which leaves little stubs wrapped in elastic sticking out of the wig. We will use these to attach Sailor Moon's buns. Cutting the wig left some frayed hair, and I used a hot glue gun (on the lowest heat setting) to coat these stubs. That kept them from fraying and helped hold them together in a solid mass. I only needed hot glue for this one step, even though I try to avoid hot glue on wigs whenever possible.
Sailor Moon's buns are called “Odango” in Japanese. Dango are dumplings (you eat them from a stick), and adding the “O” in front of Dango is like adding a Mr. or a Miss, what we call an “honorific.” So saying Odango is like saying “Miss Buns” or “Miss Dumplings,” lol. I used three-inch styrofoam balls to create the circular bun shape she has. I got them from my local craft store (Michaels) for a couple of bucks. I took a sharp pencil and stuck it into the ball about 3/4 of the way to make an opening, and then used a sharp knife to widen it. As I enlarged the hole with the knife, I would continuously check its size by comparing it to the size of the stubs. I wanted the ball to fight very tightly. The actual depth of the hole doesn't matter. It must be deep enough to let the ball sit flush against the wig. You can even make it through the ball if you want to put in the effort.
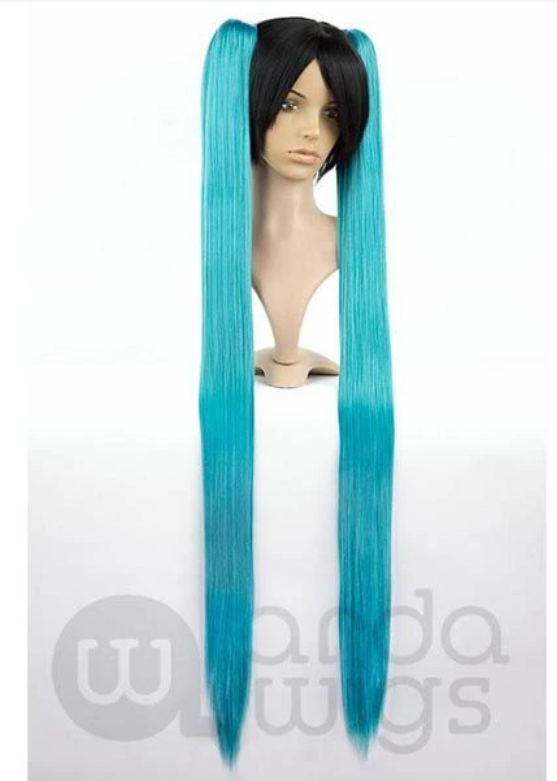
When you have two styrofoam balls sitting correctly on your wig, it's time to start on the long pigtails. I wanted to use wefts, but Arda didn't have wefts in the same color as the wig. Fortunately, the long clip comes in that color. I bought two thinking that the easiest solution would be to attach one clip to each bun, but I didn't realize how heavy these hair clips are! Arda is always generous with their wig hair; these clips are no exception. That's usually a great thing, but in this case, I was afraid it would make the wig too heavy to wear - it might even fall off my head from its weight! So instead of using two clips, I just used one and cut it into two parts.
To do this, first, remove the string that comes with the clip. Just pull it out gently. Then remove the long hair clip that comes attached to the hair. It is a little tricky, but the clip is not permanently attached. Keep at it and be gentle; you will have it out in no time. Turn the mini wig cap that holds the hair together inside out. You will see lines of wefts and, between that, some lace. You want to cut the lace in between the wefts. If you cut the wefts, the hair will fall out!
You want to divide the hair equally into two parts. I counted the wefts, divided by two, and used that to split the wefts into two equal parts. There is more hair in some wefts than in others. Unfortunately, I didn't realize that until I had cut. A better approach would be to separate the hair visually and ignore the weft count. Just make the two sides look as equal as possible. I was upset about my mistake, but fortunately, the wig looked OK. The size difference wasn't huge, but it would have been better if they were equal. Once you have divided the hair into two parts, you want to do something to keep the hair together without tangling. This long hair tangles easily! I used the clip on one side, with added elastics to separate it into neat sections and just elastics on the other side.
Now that the hair is in two parts, flip it over to see the top. It should look like a nice, clean part. If not, tidy it up so you can see the lace netting clearly, with no hairs in the part. Then just cut along the net.
Now the buns. Place the styrofoam balls on the wig stubs. Open each bun. You will notice two hair clips inside. Position the buns on the balls with the clips at the top and the bottom; this will help make the result more solid. Take the clip halves and position them to your liking on the bun, marking the end positions with chalk, so you know where to sew. Then take the buns off the balls and sew the hair clips into them with matching thread.
Now that you have the buns and ponytails attached, place one bun/ponytail assemblage on the styrofoam ball, getting it as close to the wig as possible. I had to fluff up the hair to completely cover the balls but not by much. It might have worked to leave it like this since the styrofoam balls were so tightly attached to the wig. But even if the pigtails would not fall off the wig, their weight tended to pull the buns a little away from the wig, exposing the styrofoam. That was not cute. So for safety, I sewed the buns to the wig.
If you prefer, you could use hot glue for these steps instead of sewing, but the sewing is easy and only takes a few minutes for each step. I think it looks a lot better, too. If you decide to use hot glue, it might be easier to glue the bun to the wig before gluing the pigtail to the bun. You might also consider hot gluing the styrofoam ball to the wig. If you do it this way, let me know how it works. Send a few pictures also, if you don't mind!
The wig is done and needs to be styled. I combed out the top of the wig and curled the front bangs with a curling iron. Using a curling iron on synthetic hair is different than on human hair. Once you've curled the hair, slide it off the iron and find some way to hold it in a curl until it is cold. If you don't, it will immediately straighten. I used pin curl clips.
You will also want to take the elastics out of the tail. You will probably need to comb it out and use oil sheen spray to eliminate tangles. Then curl the bottom foot or so of the tail with the curling iron. I was thrilled at how pretty and Sailor Moon-ish the whole thing looked!
WIG ALTERNATIVES
If you don't have the time or interest to make a wig, there are alternatives. One is to buy an already manufactured Sailor Moon Wig. There were some on Amazon, but they looked pretty bad (and got some bad reviews as well). Another possibility is to start with the Chiba wig as I did, but instead of cutting off the pigtails, use them as a base for the buns. The cost is about the same (you won't need the styrofoam balls), but since you don't cut the wig, you can use it for other looks than Sailor Moon.
To do this:
- Form the existing pigtails on the Chiba into round mounting buns and pin them tightly to solidify.
- Attach the sewn bun/pigtail assembly to these mounds, pinning this to the wig as needed.
- Style it.
This will look good, but probably not as good as the above method.
THE MAKEUP
There are two approaches to anime-style makeup on human faces. One way is to make your natural eyes look as dollish as possible but keep their shape. The second way is to create the illusion of an enlarged eye by drawing a bigger one and wearing lenses. The drag queen Matte ( @missgaymatte on Instagram) does this as her standard look. It's been taken up by many and Nikki Tutorials has even done a tutorial about it
I opted for the second way, which I have done a few times before (for example, my Bratz Doll Look from March 2019!

Without going into details, I will make a few suggestions about the makeup. I like to use circle contact lenses to make my eyes bigger. You can get them from many places. I buy mine from Pinky Paradise You need to put them in before you do your eye makeup because you want to match your makeup with your eyes' new size.
When you do this look, you must realize that the illusion works best from one angle. Since I would be looking directly at SheDaddy, I made sure to look straight into the mirror while I did the look.
Make your eyes look larger by covering your lower lash line and waterline with white. Then draw a new bottom part to your eye with the same white below this point. Then looking straight into the mirror, draw a circular area that connects with the iris, trying to make the whole thing look as much like one large eye as possible. Match the color of the iris as closely as possible. Adding a small circular portion to create a new bottom for the pupil can strengthen the illusion.
One common problem is shown by the Nikkie Tutorials video. Nikkie is a fantastic makeup artist and a great lady, but she draws the new fake bottom of the eye so much broader than her actual eye that it doesn't blend with her natural eye:
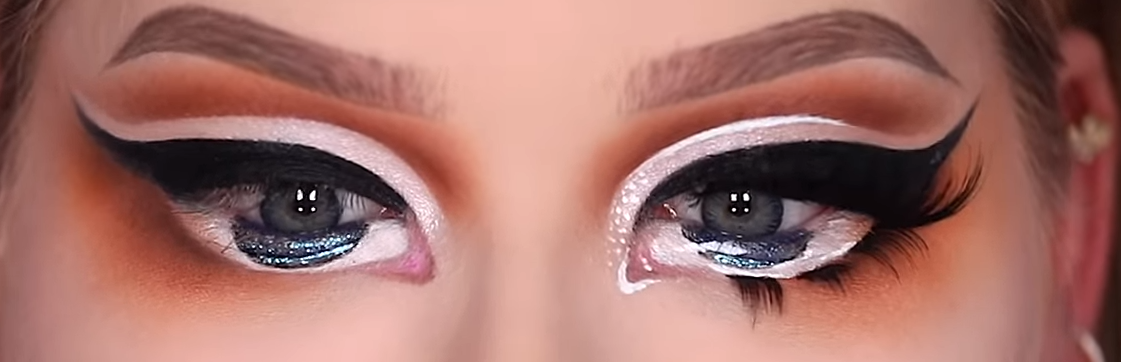
It looks like some strange circular color that doesn't make the eye appear larger. Drawing it this way might make the eye look more natural when you look to the side. But we don't usually talk to people looking at them sideways.
For the rest of the makeup, make your complexion as plastic and your face as doll-shaped as possible. I broke with the anime/Sailor Moon look to give myself big bimbo lips, so technically speaking, I am an Americanized Sailor Moon. If you want to make small anime lips, that's a great look too!
THE COSTUME AND PROPS
It would have been fun to make my costume, but I didn't have time since I was doing this for my SheDaddy's birthday. I looked at a lot of outfits and finally settled on this one, from Little For Big.
This company makes clothes for people who like to wear diapers and suck on pacifiers, which is not my fetish. When I received the costume, I was delighted with the quality and the price. Little For Big sells their stuff on Amazon, and they have directions about measuring your size. I suggest you follow them. You only need to follow the part about measuring with a diaper if you intend to wear it with a diaper, which I didn't.
Of course, Sailor Moon needs her Moon Crescent Wand. I was a little worried about buying one because I was afraid it would be crap, but I was pleasantly surprised by the quality of this one, which I found on Amazon. It was not that expensive (about 17 or 18 USD), and I think it was a fair value for the money. I also bought Moon and Crystal earrings, which were beautiful and another great deal (about 16 USD). I got them from here
I bought a Sailor Moon headband. The only one I found got some bad reviews on Amazon, but it worked for me. It is delicately made and way too expensive for quality (about 13 USD). But it looked nice, and most importantly, it fit my big American head. Get it here
The final prop I bought was a pair of beautiful, long gloves from Babe Beyond. That's a great company, and I love their stuff! I have one of their dresses which is so beautiful, and some of their other accessories as well. As with the headband, the best thing about this is that it fits my over-size Sailor Moon body. Buy it from here. And I can wear these gloves with other outfits! And a fantastic value for only 10 USD!
Sailor Moon wears red boots of a unique design. Pleaser makes some exactly like hers but not in my size. However, I already owned some beautiful red boots from Pleaser, but they weren't the same as the Sailor Moon style boots. I considered cutting them down and adding tape to make them look like hers, but I love these boots just as they are. I considered doing it anyway and buying a new pair of boots. But Pleaser is out of these boots too! Covid-19 is killing my shoe shopping. I couldn't bear to part with my beloved red boots, so, in the end, I used the Pleaser boots just as they were. I think they looked very nice.
PROBLEMS WITH THE LOOK
I was delighted with this look, as was my SheDaddy. However, if I were to do it again, I would want to do better with the props. One of the things I missed the most was Sailor Moon's Odango Shields. These are little jewels that sit in front of her buns. I found some on Amazon from the same company that made the Magic Wand, but they wouldn't have arrived in time for the birthday party, so I didn't buy them. She also has a small, circular chest piece. Once again, I located a good one, but it would not have arrived in time for the party. The last thing I want to add is the puffy, folded red cloth at the top of her long gloves. It should be easy to make, but I didn't have the fabric or the time. I love those, and if I ever do this cosplay again, I would want to add those as well.
SUMMING UP
Cosplaying and doing it well can be expensive and time-consuming, but if you love the character (and love the person you are doing this for), it's worth every penny and every minute you spend. Altogether, this look cost me around 200 USD and about 2 1/2 weeks of work, which is not bad for Cosplay standards. The most important thing is that SheDaddy loved it, and I had so so so much fun doing it!
That's it. I hope this answers your questions and maybe inspires you to do your versions of some of your favorite characters! If you have comments, send the nice ones to me.