Facelift tapes have been around for at least 50 years (probably more). The rumor is that the famously gorgeous Marlene Dietrich invented them. They are used today by Lady Gaga, Cher, and countless others. You can use them to look younger or to shape your face in interesting ways. I do both.
When I first wrote about them, they were largely the province of pro-Makeup Artists and actors, and only a few products were available. Now there is an explosion of facelift tape products. You can buy them at places like Walmart, which has dozens of brands. I gather the idea went viral on TikTok. That's interesting.
They are a simple but effective idea: you attach adhesive tabs to strategic locations on your face. Typical places are near the temples (to lift the eyes) or on the cheeks close to the ears (to smooth nasal-labial folds and lift the jawline). You then attach elastic "bungee" cords to the tabs and fasten them behind your head to pull on your skin. It's a non-surgical facelift.
I am familiar with two products, the Secret Lift and Mark Traynor brands. Both are still available. Alcone bought the rights to the Mark Traynor facelift tapes, and since then, they have been easier to find. Both still sell for the same price, although Secret Lift refills are hard to find. It's also possible to make tapes. I use the Mark Traynor tapes and bungees: they are reliable and easy to find, so I'll focus on them.
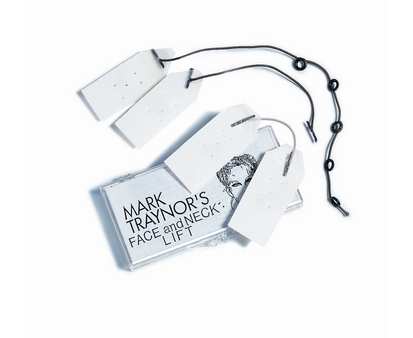 The Traynor adhesive tabs are 2 inches by 1.5 inches, and the bungee cords come in two colors to better blend with skin tones, especially hair. I place one tab near each temple and one tab near each ear. The precise placement and angle vary depending on what I want to see and the current state of my face (or my client's). I also use neck tapes to tighten the skin on the neck.
Placing the Tapes
It's important to place the tapes symmetrically. Otherwise, your face can look lopsided. Other than that, there are no hard and fast rules. I usually place one tape near each temple, angled slightly toward the eye, to get a bit of lift in the eye region. It's also interesting to put them vertically above the center of the eye. I trim the two tapes near the eyes so they don't infringe on the eyebrow.
I also place tapes near the ears. Be careful not to place them super close to the ear because that can close the ear and interfere with your hearing. It might not be the best thing for your audio mechanism. Move it slightly away, so that doesn't happen.
Depending on how pronounced the labial folds are, you may have to angle the tapes more towards the mouth. For both the eye and cheek placements, experiment by placing your fingers in the intended positions and pulling gently to see the effect.
Pay attention to the whole face. Depending on the placement, you can fix a problem in one area of the face and create another problem somewhere else. Particularly in the cheek area, you can fix the jawline or mouth lines but create wrinkles or lines near the eyes. Judicious placement of the tapes can avoid these issues.
Obviously, you don't want the tapes to be visible. The natural way to hide them is with your hair, so pay attention to hair styling. In general, I haven't had problems with this.
Attaching the Tapes and Bungees.
I attach the tapes early in the makeup process, but (except for the neck tapes), I put the bungee cords on at the end. I find this more convenient and reliable.
I also use a silicon adhesive to increase the holding power of the tapes. Once I've decided where to place the tapes, I clean the area with 99% alcohol and apply the adhesive. (I use Telesis 5). Once it's dry, I attach the tapes and gently rub them to warm the adhesive and help them adhere to the face. I find the neck tapes difficult to attach: I pre-attach the tapes to the bungee for the neck, then attach one tape, stretch the bungee, and then attach the second tape.
The Traynor bungees are constructed so that one bungee has small circles and the other has a "plug" that you insert through one of the circles. I find it easiest to hold the circle in my left hand and the plug in my right. So if I am working on a client, I put the circle bungee on the right side of the client's face (my left). When doing my makeup, I put the circle bungee on my left side.
When fastening the cords, use as much tension as you need, not more. Hold the cords behind the client's head to see the effect on their face. Once it looks the way you want, use that circle to fasten the bungee. Adding more tension than you need to achieve the look you want will only increase the risk that the tapes will pull off. Over time, the elastic band will stretch, and you need to use deeper circles to get the same tension. Eventually, you will have to replace the cords.
When I attach them to a client, I ask the client to hold the tapes with their fingers to minimize the chance that they will pull off as I attach them. It happens. When working on yourself, use care. Assuming all went well, you should be snatched for the Gods! Enjoy it!
Where and What to Buy
I started using Secret Lift tapes and then moved to Mark Traynor's tapes. I have found Traynor's product to be superior. I haven't tried any of the new ones on the market, but I'm looking at them. You can buy Traynor's tapes and bungees directly from Alcone, and they may be available in your local makeup shops or wig stores. Amazon still sells Secret Lift Kits, but the refill packages don't seem to be available.
It's worth investigating other products, and if I find any that I like, I will update this article with new information. Please let me know if you are using anything that I should consider. I would appreciate it!
Making your Own
There's a long tradition of rolling your own facelift tapes. I often did this when the tapes were harder to locate. These days, they are readily available, but I still keep a package of materials in my kit for an emergency. I recommend 3M's Transpore, which is cheaper and better than commercial tapes. I find Transpore harder to see on the face, and the adhesive is vastly superior. It is almost too good. The problem with rolling your own is convenience. They are hard to store, so you must create them during the makeup session. That takes up too much time and is why I use commercial tapes.
Typically, you will place two tapes at the temples, two tapes near the ears, and two tapes on the neck. Cut a length of Transpore tape about 6 inches long. Before you cut it into individual tapes, fold 1/4 inch of it lengthwise along the tape. You can use this folded part to handle the tape. Be careful not to create air pockets or wrinkles that will appear on the face as blemishes. Then cut the tape crosswise into one-inch wide strips.
Take a sharp, thin object (I use a metal barbecue skewer) and push it through the folded section of tape to make a hole for the bungees to go through. Getting the bungees through the holes will be easier if you push the skewer from the non-adhesive side. I do not use silicon adhesive with Transpore; it is plenty strong on its own. Then proceed as above to attach the tapes. Use extra care when removing them, as they hold on extremely well, and if you are not careful, they will take some of the facial skin right off when you remove them!
That's it. I hope this helps you snatch your face and make a better impression in all your transformations. If you have comments, send the nice ones to me!