Why Relace?
Your corset probably already came pre-laced and ready to go. Why go to the trouble of relacing it? To answer that question, here's a picture of the typically laced corset I found on a corset website. Every corset I've purchased (I've owned five now) came laced as shown in the picture.
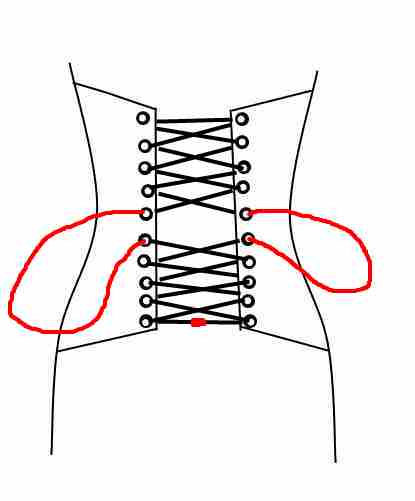
There are two problems with this method of lacing. Since the laces enter from the same side, they cross the corset edges and tend to rub on them. Over time, this will wear away the cloth so this lacing method can shorten the life of an expensive article of clothing. I prefer lacing methods that never cross the edges of the corset. If the lace comes from underneath the corset on the left side, then it should enter the corset from underneath on the right side and vice-versa. Lacing a corset this way forms upper and lower Xs and reduces wear.
The second problem is more critical for waist trainers or tightlacers. I've always found it strange that traditional corset lacing leaves the point of greatest tension, the waist, with no lacing at all! You can see this clearly from the drawing of the traditional bunny ears. There are no laces right where you want them most! The usual way to get more tension at the waist is to lace the corset straight up so the bunny ears are at the very top or bottom. This lacing solves the tension problem, but it becomes vastly more difficult to put the corset on yourself.
The method I show here, which I discovered by looking at photos of the famous waist trainer Cathie Jung, keeps the bunny ears in the middle but eliminates the waist lacing gap. Cathie has the Guinness Book of World Records for the world's smallest waist, so I think she knows a thing or two about corset lacing! When I changed my lacing, I could instantly decrease my waist size by an entire inch just because of the lacing change!
These two considerations are independent, so if you don't want to use the tightlacing variation, you can still use the "over-under" method to lace your corset with the traditional bunny ears. Or vice-versa.
General Considerations
I like to mark the waist of the corset with painter's tape so I know where the "bunny ears" come out. You can use the waist tape as a guide, but sometimes that is hidden by a lining. So before unlacing your corset, put some painter's tape between the two "bunny ear" grommets. I also use a piece of tape to mark the center of the cord so I come out evenly at the end.
If you use the over-under lacing method I advocate, you must pay attention to how the lacing starts. Bunny ears start from underneath the corset, then immediately back in the next grommet from the top. A little pre-calculation will make this happen: If you have an even number of grommets between the first hole of the bunny ear and the top of the corset, you start lacing from underneath. Otherwise, start from the top.
Let's Do It!
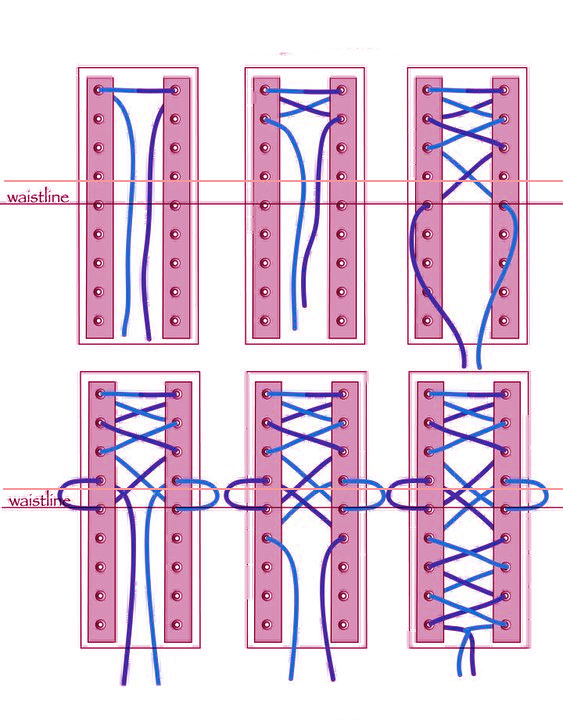 For corset lacing, a picture is worth a thousand words. Note the lines where the two grommets that mark the waistline are. That's where your bunny ears will be. Since there is an odd number of grommets between the top of the corset and the first bunny ear grommet (only three in this diagram), we start the lacing outside the corset. Since we start on the outside, the next lacing should come from the inside, then the outside, and so on.
When we reach the bunny ear grommet, you have two choices. You can bring the cord up from the inside, pull out a length of cord for the ear, and immediately reinsert it, finishing up the lacing. That will give you the normal "laceless" gap. If you want the tight lacing variation, skip the first bunny ear grommet and come up from beneath on the second bunny ear grommet. Now insert the cord into the first bunny ear grommet above the one you exited. Do this on both sides, then continue as you did before.
To finish, tie a simple knot. I usually hold the ends together, treating both cords like a single piece of cord, making a loop, and pulling the ends through it. That holds well for me.
This Will Change Some Things
The tightlacing variation causes two differences that will take some time to get used to. First, there will be one less "X" to pull on when you are lacing on your corset. Secondly, you will discover that the bunny ears' function is inverted. With traditional bunny ears, the top part of the loop tightens the top part of the corset, and the bottom part tightens the bottom part.
With this tight lacing variation, the top part of the loop tightens the bottom, while the lower part of the bunny ear loop tightens the upper part. You'll get used to it.
That's it for today. Thanks for reading, and if you have something nice to say or a good idea or suggestion, you can always write!