If you have heart or breathing issues, skeletal problems, or anything that might cause you difficulty wearing corsets, please consult your physician before wearing a corset.
This is where we put on our corset. We'll discuss how to do it, ensuring that your beautiful new companion fits you perfectly. Putting a corset on for the first time should never be painful.
Seasoning a Corset
There are a lot of people who feel you need to "season" a corset. Seasoning is a process where you wear it only slightly tightened for a short time to "break it in." The argument is that the metal bones and the rigid cloth used to make the corset need some time to mold themselves to your body. "If you don't season your corset," these people will tell you, "you can damage it." Seasoning has a double benefit if you're a new corset wearer: you simultaneously season the corset and yourself.
Conversely, some very experienced and knowledgeable corset wearers think this whole seasoning idea is nonsense. They claim they have never seasoned a corset and never had a problem.
The people on both sides of this argument have much more experience than I do; I won't take sides. However, right or wrong, it seems prudent to season your corset. Why take a chance?
How to Season a Corset
There are various seasoning schedules that you can find on different corset makers/wearers' websites, but the most common one is called the "2-2-2" system. You wear the corset for 2 hours a day, with a 2-inch waist reduction, for two weeks. That will season the corset; after this, you may tighten it as you wish. The corset should be snug but not overly tight during the seasoning process. The usual description is that it should feel like someone is hugging you. You should be able to insert your hand inside the corset.
How to Put On a Corset
You'll need your corset and a cloth tape measure (such as used for sewing). Before putting on your corset, lay it down and look at the lacing. You'll notice a straight cord across the top and bottom grommets and then several "crossings" up to the waist where the "bunny ears" are. Remember how many crossings there are because you will have to tighten these X's one by one after you put the corset on.
1. Put it on with the right side up.
OK, things are getting serious now. The first step is to put the corset on the right way. You would be surprised how many pictures there are of corset wearers with their corsets upside down! There are two easy ways to identify the top of the corset:
- If the corset has garter straps (or loops to attach garter straps to it), those go on the bottom.
- Not all corsets have garter loops/straps. For these corsets, remember that when you fasten the corset, the studs should be on the left side, while the loops are on the right. If the loops are on the left, your corset is upside down.
2. Make sure it's loose enough.
Put the corset around your waist. It should be loose enough that you can fasten the busk easily, without any sucking in of your stomach or tugging on the corset. If you can't do that, remove the corset and loosen it. Otherwise, you run the risk of damaging the busk fasteners.
To loosen the corset, pull some of the lengths from the bunny ears into the gap at the waist, then adjust the other "Xs" in the gap, so it is evenly spaced from top to bottom.
3. Fasten the busk.
Once it is loose enough, fasten the busk. I used to start with the top loop, but that was a mistake. It's much better to start with the second loop from the top. Once fastened, move downward, then fasten the top loop last. This method places the least strain on the fasteners. Ensure the loops are completely on the studs, not just hooking the tips! Make sure the narrow part of the corset is at your waist.
4. Pull the bunny ears tight
If you have someone to help you, that's great. Otherwise, grab the bunny ears and pull them to the left and right. Don't pull them straight back. The corset will not tighten evenly at each crossing. Instead, the waist will pull tight, but the upper and lower crossings will be loose.
To tighten the corset evenly, bring the loops around to the front of the corset and hold them in one hand. With your other hand, start at the corset's top (or bottom), pulling each loose crossing tight until you get to the waist. To tighten the final crossing before the waist, take the loops in both hands, pulling it taut. Repeat from the other end of the corset.
Repeat, as needed, until the corset is at the desired size, then tie it in a 'shoelace' knot in the back. Never double knot your corset! You may need to get out of it quickly, and a double knot will make this impossible! To finish, tuck the loose ends of the corset out of the way, beneath the corset.
Taking Off the Corset
Never try to remove a corset without loosening the cord! That will damage the fasteners! Instead, undo the knot and, starting at the waist, pull the slack into the gap, working up and down. Keep doing this until the corset is quite loose, and it's easy to unfasten. Once it is off, hang it on the back of a chair or a hanger to air.
If you're having trouble visualizing this, here's a video from my favorite corset expert, Lucy, illustrating the process:
Fine Points of Corset Wearing.
Beginners sometimes have trouble knotting the corset in the back, preferring to bring the loops around to the front and tie it there. It not only looks better to tie it in the back, but it will also extend the life of your corset. Corsets are expensive, so that's a good thing! It takes a little practice, but give it a try.
The corset gap should be parallel and vertical. Especially dangerous for your corset are gaps that narrow or bulge around the waist. These bulges can permanently deform the bones of your corset. The corset should also not bulge outward, away from your back.
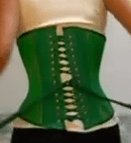
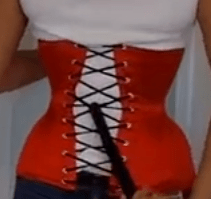 The outward bowing you see in the red corset is caused by a corset whose waist is too small for you, at least for the moment. Corset bones that are too weak can also cause this. Wearing it this way can deform and weaken the metal bones of the corset. See the section on flair below if you are waist training. If you are not waist training, try a larger corset.
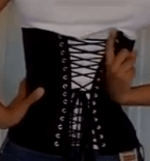 The inward bowing (black corset) is because your body is curvier than the corset! I wish I had your problems! Exchange this for a corset that is closer to your waist size!
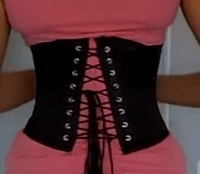 This corset is too small for your hips, making an upside-down "V" shape. It would be better to have a corset that fits you, but since the bones are straight (not curved, as in the previous example), this won't damage the corset. It's less than ideal because it will probably dig into your hips and be uncomfortable. If it's not uncomfortable, and you like the corset, there is no harm in wearing it this way.
 This is a "V" shape. Some corsets are supposed to have this shape. If your corset isn't, it is too small for you at the ribcage or shoulders. Once again, since the bones are straight, wearing it won't damage the corset. If it's not uncomfortable, keep wearing it this way.
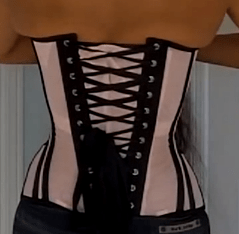
 In this photo, the corset edges are parallel (which is good), but they are not vertical. Instead, they are at an angle which might be a problem with the corset. With the corset off, take three horizontal measurements on each side of the corset: top, waist, and bottom. They should be the same. If not, the corset has a manufacturing defect. Some corsets are made of twill, which is very strong, but can stretch more along one bias than the other due to its asymmetric weave, so it might have been OK at first and become asymmetrical as you wore it.
It can also be caused by just putting your corset on crooked. Don't keep wearing it this way, as corsets can get "stuck" in a certain shape, and you'll never get them back to the right one. I suggest always checking your corset fit in a mirror (or with a properly arranged camera) to ensure it's straight.
This will also happen if your body is very asymmetrical. If you have scoliosis, a broken rib, or one leg is significantly longer than the other one, then a symmetric corset will look like this on you. In this situation, the only way to get a correctly fitting corset is to have one custom made for you.
Now look for flare.
"Flare" is when the corset doesn't fit snugly at the top and bottom, leaving a gap. Flare is to be expected if you are waist training. Waist trainers buy corsets with their current ribcage and hip measurements but a smaller waist size. When they achieve their new waist size, the corset should fit perfectly, and the flare will disappear.
Flare doesn't look great, but it's bad for the corset to lace the top and bottom more tightly. You will end up with a corset that looks like the bulging red corset (above), and you run the risk of permanently deforming your corset. Be patient, and you will get there1
If your corset is completely closed in the back, or you are at your target waist measurement and still experiencing flaring, the corset fit is bad. Your measurements may have been off, or the corset maker made an error.
For Further Information
I hope this helped you out. Corsetting is a complex topic, and there's much to know about it. I hope I haven't scared you away! If you want more information, I recommend Lucy's Corsetry Lucy is an amazing woman, filled with knowledge and passion for corsets and corsetry.
Thanks for reading, and if you have something nice to say or a good idea or suggestion, you can always send me a message!