What You Need
Where you do your makeup is important. I think everyone needs:
- Good lighting
- A full-sized mirror
- A magnifying mirror
- A comfortable chair
- Organized makeup storage
It's also really great if your makeup area is pretty and attractive, but that's not as important as the five items above.
Lighting
Traditionally, daylight has always been considered the best light. I'm not sure that's true. What about evening makeup that never sees the light of day? Wouldn't it be better to do it under similar conditions? I think that's a fair question, and I'm not sure I have a good answer.
One thing for certain is that you must see yourself well enough to do a good job. You should be facing the light. If the light comes from above your face or to the side, your head will block part of it, creating shadowed areas on your face. That's a disaster. The light should be bright, but not too bright. It's not so easy to get good lighting for makeup.
A Mirror
You need a mirror. I think you need more than one mirror. I like to have a regular mirror that shows my whole face and a magnifying mirror to work on details. My eyesight isn't great, but even people with great vision use magnifying mirrors. Magnifying mirrors can distort a bit and tend to be on the small side, so it's best to have both.
Comfort
Doing makeup takes a long time. To do a good job on a complicated look can take several hours, so you want to be in a place where you are comfortable.
Organization
Obviously, you will do a better job if you don't have to hunt for every piece of makeup you need. Find a way to organize your makeup, brushes, and the other things you need that work for you. Here's my current solution.
My Stages
I could describe the setup I am using today but would that help you? It might help if we have similar amounts of makeup and experience. If you're starting, I doubt it will help much, if at all. So instead of telling you how it is right now, I will go all biographical and tell you how it was when I was a beginner and how I ended up choosing the workspace I use today.
Up to a point, I would say my evolution is "fairly typical." However, I realize that at some point, some of you will think, "This girl has gone too far." I get that a lot. Just remember that I am not telling you where you should go. I think you should do whatever you want. I'm just telling you where I've been and how I got to where I am today. I hope it will help you get where you want to go.
Stage 1
I had a few pieces of makeup stored in a cardboard box. The mirror was an old hand mirror with a handle that an ex-GF had left in my bathroom. It sounds pathetic, but with the inspiration provided by Dom de Luxury, it was good enough to start learning the basics.
Stage 2
I was starting to realize what a pain in the butt it was to use my ex's hand mirror, so I started looking for a better one. At a minimum, I wanted to use both hands to do my makeup and not dedicate one to holding a mirror. The cardboard box was getting more makeup, but it was still OK. The big problem was the mirror, so I started ordering mirrors from Amazon. Not counting my ex's hand mirror, I tried three:
The NYX Folding Mirror which I returned quickly to Amazon. It's a good mirror and might even be a great travel mirror, but it's way too small for me to use for my daily makeup. As I looked at what was available, I realized I needed magnification. And better light.
The next mirror I tried was The Jerdon, which had solutions for both of these problems. It is a tri-fold mirror (left and right mirrors, plus one in the center), so you can see your left and right sides without turning your face. The center mirror has a magnifying mirror (5x) and a normal mirror. These are back-to-back, and you switch between them by rotating the mirror frame vertically on its axis. That's a nice feature!
The Jerdon's most interesting feature is its lighting. You can adjust the lighting it puts on your face with a slider at the bottom of the mirror. It has settings for daylight, evening, home, and office. I used this mirror for a few months and found it greatly improved over the ex-GF mirror. But eventually, I became frustrated with its size. For all its good features, it is just too small for me. But it's a good, solid product that might work for you. It folds up for easy storage and might make a good travel mirror. And it's very reasonably priced for around $29, cheaper than the NYX mirror! I gave it to a friend, and a year later, she still loves it. If you are in the market for a good mirror, I think it's worth your consideration. You could do a lot worse.
Meanwhile, my cardboard box of makeup started to overflow, and I started using some plastic garment bags from Amazon shipments for the makeup. These had sections so I could make a stab at keeping things organized. It was better.
Stage 3
Stage 3 started with me spending too much money on a new mirror. I bought the Simple Human 8'' sensor mirror with 5x magnification. It is circular and has a ring of light around the outside which attempts to simulate pure outdoor light. I've used this mirror for over a year and am still reasonably happy with it. The main problem with this mirror is its outrageous price - I spent around $200 on it! I still wince every time I remember doing that. But when I purchased it, there was no comparable product with similar magnification and size. I believe you have more choices today, so look around before blowing this kind of cash on the Simple Human mirror.
Aside from the price, the other problems with this mirror are:
- The much advertised 'sensor,' which turns on the light when your face is near it, is more of a pain than a pleasure.
- The mirror doesn't fold up for easy storage. It's intended to always be out on a vanity table.
- The power cord is too short. You would think that for $200, they could be more generous with the cord.
Overall, these issues are minor, and I am happy with this mirror and intend to keep using it.
How to use a Magnifying Mirror
Let's take a short detour to talk about how to use one of these things. It's a little counterintuitive. To magnify a feature you are working on in the magnifying mirror, move away from the mirror. I have noticed that most people do the opposite. They move closer to the mirror, which is natural to do when trying to see better. Unfortunately, thanks to the laws of physics, this reduces magnification to almost nothing.
Stage 4
Stage four started when I tried to solve two new problems. I now had way too much makeup for my plastic organizing bags to handle. And because I had so much stuff now, it was a real pain to set up and take down a makeup station every time I needed to do makeup. So I decided to allocate a permanent section of my home as a makeup area. I used an inexpensive, square folding table for the area and bought two large, sectionable plastic tubs from The Container Store to hold and organize my makeup and smaller tools. They stayed permanently on the table, with my brushes (held in pretty water glasses with rice on the bottom) and my magnifying mirror.
Of course, as time passed, I added even more makeup, and now the two plastic bins are overflowing. And I've become dissatisfied with some things about my makeup area. I still like the magnifying mirror from Simple Human, but to do good makeup, you also need a large regular mirror. Sometimes you need to see your whole face (especially for eyebrows and lips), and even the best magnifying mirror can distort. My full-size mirror is in the bathroom, so I had to go to another room to use it, then return to my makeup table. That was getting old. And I wanted more light - the light provided by the Simple Human Mirror does not provide as much as I would like and doesn't eliminate the shadows thrown on my face by the ambient light in the room. Now we are up to today, and my latest work area, which I finished just this week, brings us to what I can call Stage 5.
Stage 5
I wanted to buy a vanity to solve my growing frustration with my stage 4 setup. These are desks with a lighted mirror either mounted on the wall or sitting on the desk. I knew this would be expensive, but my frustration was so intense that one morning I woke up and said, "I gotta have a vanity! I don't care what it costs!"
At least that's what I said until I started shopping. Vanities set a new standard for being "overpriced." It turns out that they can cost anywhere from $2000-$5000. What's worse is that even at the highest price point, while they look gorgeous, they don't offer the features I craved (like a well-lit mirror and lots of drawers for makeup).
The DIY Bug Bites
So I decided to make my own. How hard can it be? You get a desk, and then you get a mirror. Problem solved. The desk part was easy. I know a lot of makeup people, and almost all of them love the Alex drawers from IKEA for makeup storage. You can combine these with what IKEA calls a LINMON top, a piece of finished wood that rests on two Alex drawer units (or has legs on one side and a drawer unit on the other). I have always loved the nice, clean look of IKEA's products, and I have several things by them. I liked this solution. And the price is fair: $207 U.S. for the version with the two drawer units plus a pleasant hour or two of assembly time. Here's a picture of the Alex desk with one drawer unit:

Nice, right? The one with two drawer units replaces the legs on the right, duplicating the drawers on the left.
The Mirror and Lights
The mirror with the lights, which was what had my motor running, proved to be more challenging. The best-known company for desk top vanity mirrors seems to be "Vanity Girl Hollywood ." I have a friend who owns one of their products, and she loves it. For myself, I wasn't feeling it. They have three desktop models:
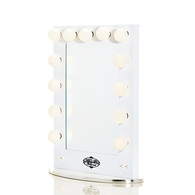
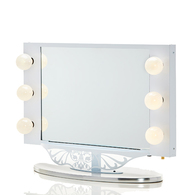
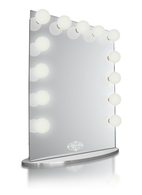
I think you need lights across the top and along the sides for proper lighting, so the middle one was out. The one on the left is too narrow for my tastes, leaving the one on the right, which they call their "Infinity Mirror." I have construction issues with that one. And I have price issues with all of them. Vanity Girl Hollywood is currently running a sale, and I could buy the Infinity Mirror for $369 (free shipping). That would put my total expenditure around $576, much better than $2000, but the mirror was not calling out to me. If it is calling to you, I get that. Buying one is for sure easier than building your own. So if you're interested in pursuing that route, here's the Vanity Girl Hollywood Website. If you buy one, please let me know which one and how you like it.
The DIY Bug Burrows Deeper
I started investigating other solutions. Searching on Amazon, I discovered that there are companies that make lights that attach directly to a mirror. These all use double-sided sticky tape from 3M to attach the mirrors. Some of the prices for these products on Amazon are crazy cheap, emphasizing crazy. Decorative vanity light bulbs are not cheap, and it seemed to me that some of these sellers must be selling at a loss (or else using crappy products). However, they got good reviews. I saw attachable light hardware (light bulbs included) with ten lights selling for $32! The best price I found for ten good light bulbs was $35, so this seems like a crazy price.
But I must admit that the reviews were positive overall. These are only the lighting, you have to buy the mirror, but you can find nice mirrors for around $30. That would give you a lit vanity mirror (with a dimmer switch, which I consider essential) for around $70!
Unfortunately, despite the many good reviews, these products gave me nightmares. I couldn't shake the image of these things falling around my head, leaving broken glass everywhere. And a few people did say that the lights didn't stay attached. Do I need this kind of stress while putting on lipstick? That's stressful enough! So no, I'll pass on this option. But it might work for you. I don't want to give specific links because I don't have any experience or advice to offer, but if you are interested, a search on Amazon.com for "vanity mirror lights" will get you many products to choose from.
Thanks to this search, however, I found some beautiful chrome vanity light bars, originally intended to be installed on the wall in your bathroom. That led me to a solution to my dilemma. I made myself a beautiful 45" x 30", 16-light vanity mirror with a matching desk for around $250! That compares very well with the Infinity Mirror, which has only 13 lights and no desk for $369 (on sale). To see what I did in all of its gorgeousness along with complete instructions on how to make one yourself, please see part 2.
That's it for now. You can send questions, comments, or anything friendly to me. I always love to hear from you!